开发者可以使用云开发开发微信小程序、小游戏,无需搭建服务器,即可使用云端能力。
云开发为开发者提供完整的云端支持,弱化后端和运维概念,无需搭建服务器,使用平台提供的 API 进行核心业务开发,即可实现快速上线和迭代,同时这一能力,同开发者已经使用的云服务相互兼容,并不互斥。
目前提供三大基础能力支持:
1、云函数:在云端运行的代码,微信私有协议天然鉴权,开发者只需编写自身业务逻辑代码
2、数据库:一个既可在小程序前端操作,也能在云函数中读写的 JSON 数据库
3、存储:在小程序前端直接上传/下载云端文件,在云开发控制台可视化管理
具体的可以去小程序文档上查看,下面用一个登录注册的案例来演示小程序云开发数据库的运用
注册
在创建的时候,要在点下一步的时候,调数据库来看用户名有没有重复的。在点击同意的时候来调用数据库,然后把所有的判断放到下一步来判断。所有条件都满足就将用户名和密码放到全局变量中。
var app = getApp();
Page({
 data: {
  userName: '',
  userPassword: '',
  userPasswordAgain: '',
  checkbox: false,
  repetition: false
 },
 // 返回主页面
 backHomeTap: function() {
  wx.switchTab({
   url: '../index/index',
  })
 },
 // 绑定
 bindingTap: function () {
  wx.redirectTo({
   url: '../login/login',
  })
 },
 // 用户名
 userNameInput: function(e) {
  this.setData({
   userName: e.detail.value
  });
 },
 // 密码
 userPasswordInput: function(e) {
  this.setData({
   userPassword: e.detail.value
  });
 },
 // 再次输入密码
 userPasswordAgainInput: function(e) {
  this.setData({
   userPasswordAgain: e.detail.value
  });
 },
 // 同意
 checkboxChange: function() {
  if (this.data.checkbox === false) {
   this.setData({
    checkbox: true
   })
  } else {
   this.setData({
    checkbox: false
   })
  }
  var that = this;
  var userName = this.data.userName;
  // 初始化云
  wx.cloud.init({
   env: 'wubaib-9543f7',
   traceUser: true
  });
  // 初始化数据库
  const db = wx.cloud.database();
  const _ = db.command;
  db.collection('userInformation').where({
   userName: _.eq(userName)
  }).get({
   success: function (res) {
    if (res.data.length === 1) {
     that.setData({
      repetition: true
     })
    }
   }
  })
 },
 // 下一步,完善个人信息
 perfectInforTap: function() {
  var userName = this.data.userName;
  var userPassword = this.data.userPassword;
  var checkbox = this.data.checkbox;
  var userPasswordAgain = this.data.userPasswordAgain;
  var name = /^[A-Za-z0-9\u4e00-\u9fa5]+$/;
  var repetition = this.data.repetition;
  if (userName === '') {
   wx.showToast({
    title: '请输入用户名',
    icon: 'none',
    duration: 2000,
    mask: true
   })
  } else if (!name.test(userName)) {
   wx.showToast({
    title: '用户名格式不正确',
    icon: 'none',
    duration: 2000,
    mask: true
   })
  } else if (repetition === true) {
   wx.showToast({
    title: '用户名已存在',
    icon: 'none',
    duration: 2000,
    mask: true
   })
  } else if (userPassword === '') {
   wx.showToast({
    title: '请输入密码',
    icon: 'none',
    duration: 2000,
    mask: true
   })
  } else if (userPassword.length < 6) {
   wx.showToast({
    title: '密码最少6位',
    icon: 'none',
    duration: 2000,
    mask: true
   })
  } else if (userPassword !== userPasswordAgain) {
   wx.showToast({
    title: '两次密码输入不一致',
    icon: 'none',
    duration: 2000,
    mask: true
   })
  } else if (checkbox === false) {
   wx.showToast({
    title: '请选中已阅读',
    icon: 'none',
    duration: 2000,
    mask: true
   })
  } else {
   wx.redirectTo({
    url: 'perfectInfor/perfectInfor',
   })
   // 保存用户名和密码
   app.appData.account = {
    userName: userName,
    userPassword: userPassword
   }
  }
 }
})
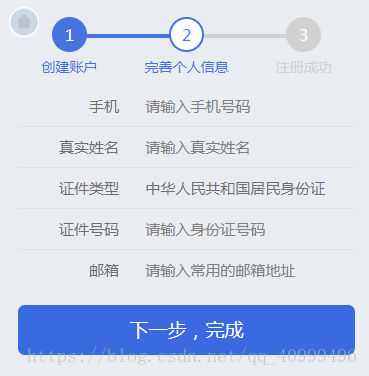
在完善信息的时候获取所有的变量(用户名和密码也在内),然后在点击下一步完成按钮将数据上传到数据库。
"htmlcode">"登录成功"); // 保存手机号,真实姓名,身份证号,邮箱 保存用户名 that.setData({ userName: res.data[0].userName, phone: res.data[0].phone, realName: res.data[0].realName, card: res.data[0].card, email: res.data[0].email, userId: res.data[0]._id }) app.appData.userinfo = { phone: that.data.phone, realName: that.data.realName, card: that.data.card, email: that.data.email } app.appData.account = { userName: that.data.userName } app.appData.userId = { userId: that.data.userId } wx.switchTab({ url: '../personalCenter/personalCenter', }) } else { wx.showToast({ title: '用户名或密码错误', icon: 'none', duration: 2000 }) } }) } }, })登录WXML
<view class='phoneNumberContainer'> <input placeholder='用户名' maxlength='11' bindinput="bindNameInput"></input> </view> <view class='passwordContainer'> <input placeholder='密码' password="true" bindinput="bindPasswordInput"></input> </view> <view class="{{isChecked" bindtap='bindingSuccess'>立即登录</view> <view class='registerContainer' bindtap='registerTap'>注册账号</view>注册第一步的WXML
<!--返回主页 --> <view class='backHome' bindtap='backHomeTap'> <image src='/images/homeIcon.png' class='backHomeImg'></image> </view> <!--头部 --> <view class='headerContainer'> <!--创建账户 --> <view class='headerListContainer headerListActive'> <view class='headerListView'>1</view> <text class='headerListText'>创建账户</text> </view> <!--完善个人信息 --> <view class='headerListContainer'> <view class='headerListView'>2</view> <text class='headerListText'>完善个人信息</text> </view> <!--注册成功 --> <view class='headerListContainer'> <view class='headerListView'>3</view> <text class='headerListText'>注册成功</text> </view> <view class='transverseLineLeft'></view> <view class='transverseLineright'></view> </view> <view class='mainContainer'> <!--用户名 --> <view class='mainListContainer'> <view class='mainListText'>用户名</view> <input class='mainListInput' placeholder='请输入数字,字母或中文' maxlength='25' bindinput='userNameInput'></input> </view> <!--密码 --> <view class='mainListContainer'> <view class='mainListText'>密码</view> <input class='mainListInput' placeholder='长度6~14位' password='true' maxlength='14' bindinput='userPasswordInput'></input> </view> <!--确认密码 --> <view class='mainListContainer'> <view class='mainListText'>确认密码</view> <input class='mainListInput' placeholder='请再次输入密码' password='true' maxlength='14' bindinput='userPasswordAgainInput'></input> </view> </view> <!--agree --> <view class='agreeContainer'> <checkbox class='agreeCheckbox' checked="{{check}}" bindtap="checkboxChange"/> <text>我已阅读并接受</text> <text class='clause'>《用户注册条款》</text> </view> <!--nextButton --> <view class='nextButton' bindtap='perfectInforTap'>下一步,完善个人信息</view> <!--binding --> <view class='bindingContainer'> <text>已有账号</text> <text class='binding' bindtap='bindingTap'>请绑定</text> </view>注册第二步WXML
<!--返回主页 --> <view class='backHome' bindtap='backHomeTap'> <image src='/images/homeIcon.png' class='backHomeImg'></image> </view> <!--头部 --> <view class='headerContainer'> <!--创建账户 --> <view class='headerListContainer headerListOldActive'> <view class='headerListView'>1</view> <text class='headerListText'>创建账户</text> </view> <!--完善个人信息 --> <view class='headerListContainer headerListActive'> <view class='headerListView'>2</view> <text class='headerListText'>完善个人信息</text> </view> <!--注册成功 --> <view class='headerListContainer'> <view class='headerListView'>3</view> <text class='headerListText'>注册成功</text> </view> <view class='transverseLineLeft'></view> <view class='transverseLineright'></view> </view> <!--main --> <view class='mainContainer'> <!--手机 --> <view class='mainListContainer'> <view class='mainListText'>手机</view> <input class='mainListInput' placeholder='请输入手机号码' maxlength="11" bindinput='phoneInput'></input> </view> <!--真实姓名 --> <view class='mainListContainer'> <view class='mainListText'>真实姓名</view> <input class='mainListInput' placeholder='请输入真实姓名' maxlength='25' bindinput='nameInput'></input> </view> <!--证件类型 --> <view class='mainListContainer'> <view class='mainListText'>证件类型</view> <view class='cardText'>中华人民共和国居民身份证</view> </view> <!--证件号码 --> <view class='mainListContainer'> <view class='mainListText'>证件号码</view> <input class='mainListInput' type='idcard' placeholder='请输入身份证号码' maxlength="18" bindinput='cardInput'></input> </view> <!--邮箱 --> <view class='mainListContainer'> <view class='mainListText'>邮箱</view> <input class='mainListInput' placeholder='请输入常用的邮箱地址' bindinput='emailInput'></input> </view> </view> <!--nextButton --> <view class='nextButton' bindtap='registerSuccessTap'>下一步,完成</view>以上就是本文的全部内容,希望对大家的学习有所帮助,也希望大家多多支持。
标签:
微信小程序,云开发
免责声明:本站文章均来自网站采集或用户投稿,网站不提供任何软件下载或自行开发的软件!
如有用户或公司发现本站内容信息存在侵权行为,请邮件告知! 858582#qq.com
暂无“微信小程序云开发(数据库)详解”评论...
稳了!魔兽国服回归的3条重磅消息!官宣时间再确认!
昨天有一位朋友在大神群里分享,自己亚服账号被封号之后居然弹出了国服的封号信息对话框。
这里面让他访问的是一个国服的战网网址,com.cn和后面的zh都非常明白地表明这就是国服战网。
而他在复制这个网址并且进行登录之后,确实是网易的网址,也就是我们熟悉的停服之后国服发布的暴雪游戏产品运营到期开放退款的说明。这是一件比较奇怪的事情,因为以前都没有出现这样的情况,现在突然提示跳转到国服战网的网址,是不是说明了简体中文客户端已经开始进行更新了呢?
更新动态
2025年02月25日
2025年02月25日
- 小骆驼-《草原狼2(蓝光CD)》[原抓WAV+CUE]
- 群星《欢迎来到我身边 电影原声专辑》[320K/MP3][105.02MB]
- 群星《欢迎来到我身边 电影原声专辑》[FLAC/分轨][480.9MB]
- 雷婷《梦里蓝天HQⅡ》 2023头版限量编号低速原抓[WAV+CUE][463M]
- 群星《2024好听新歌42》AI调整音效【WAV分轨】
- 王思雨-《思念陪着鸿雁飞》WAV
- 王思雨《喜马拉雅HQ》头版限量编号[WAV+CUE]
- 李健《无时无刻》[WAV+CUE][590M]
- 陈奕迅《酝酿》[WAV分轨][502M]
- 卓依婷《化蝶》2CD[WAV+CUE][1.1G]
- 群星《吉他王(黑胶CD)》[WAV+CUE]
- 齐秦《穿乐(穿越)》[WAV+CUE]
- 发烧珍品《数位CD音响测试-动向效果(九)》【WAV+CUE】
- 邝美云《邝美云精装歌集》[DSF][1.6G]
- 吕方《爱一回伤一回》[WAV+CUE][454M]


