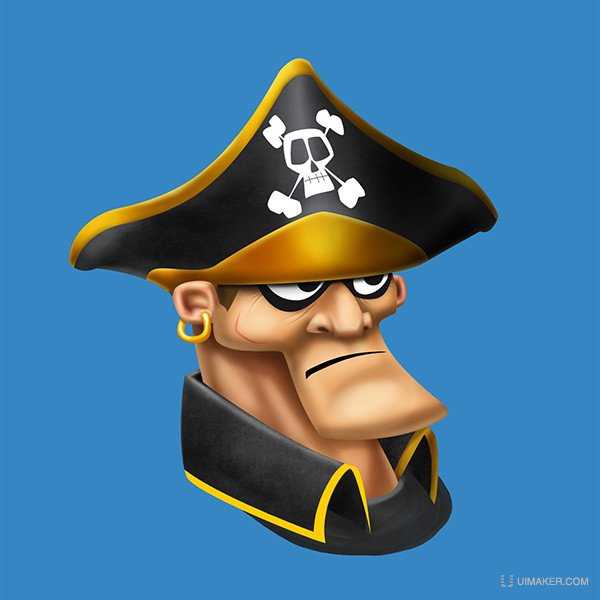
Step 1
Let’s start with a sketch, I always draw a sketch and scan it into my computer.
让我们从一个草图开始,我总是画一个草图扫描进我的电脑。

Step 2
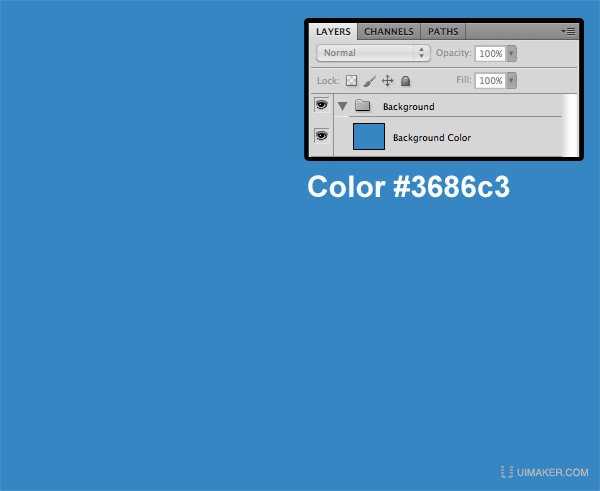
Create a new 2000 by 1800 pixel document with a white background. Fill the background layer with a blue color #3686c3. Put the layer in a group, name it "Background", duplicate the background layer, rename it "Background Color" and put it in the "Background" group. Delete the old background layer.
创建2000*1800像素白色背景新文件。 用蓝色#3686c3填充背景层。 命名为“背景颜色 ”。
Step 3
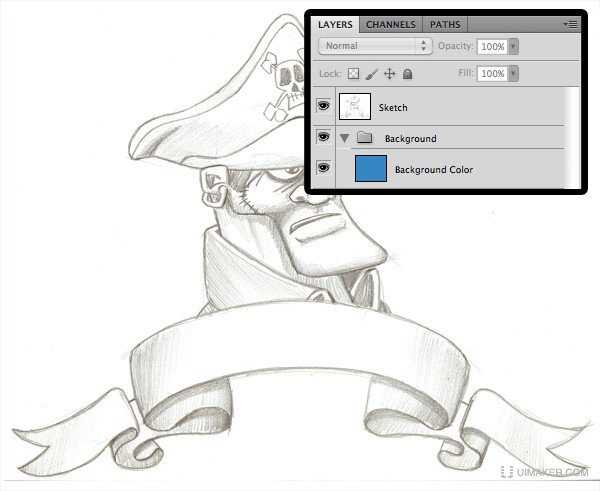
Put the sketch in a new layer and name it “Sketch”.
载入一个新图层,命名为“素描”。
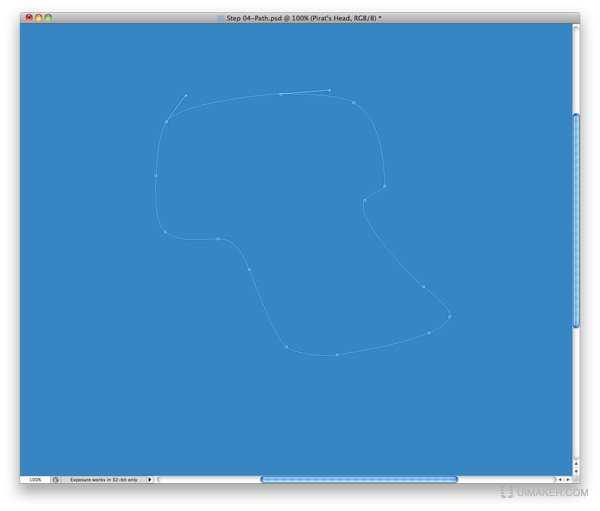
Step 4
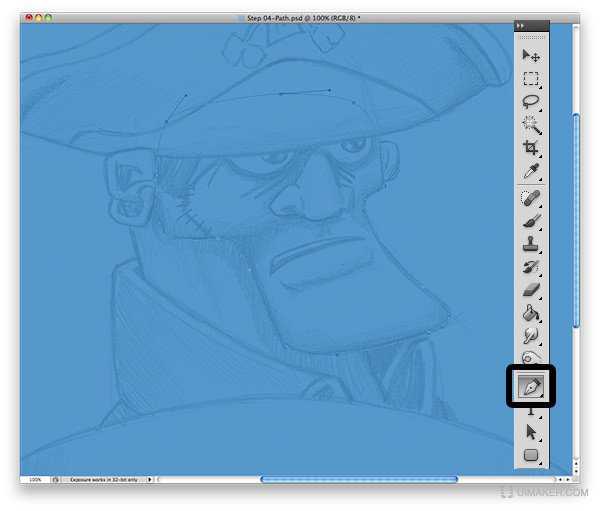
Set the “Sketch” Opacity to 20%. Use the Pen Tool (P) to draw the head shape.
设置“素描”不透明度为20%。 使用钢笔工具(P)绘制的头部形状。
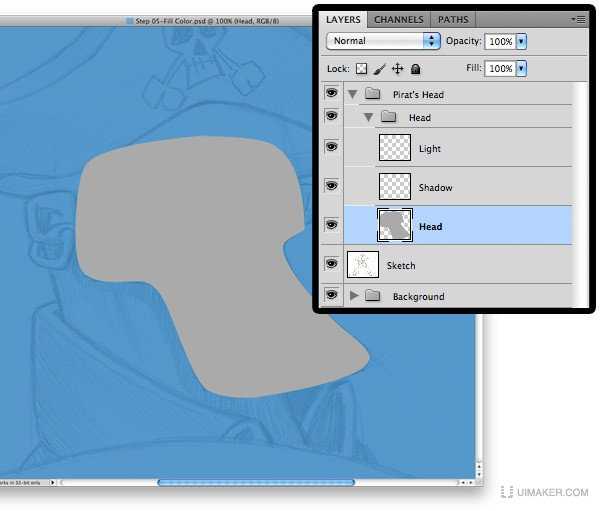
Step 5
Once the head path is complete, right click on the path, select Make Selection, then press OK.
Create a new layer and name it with a name easy to remember (in this example, name the layer “Head”).
Fill the selection with a grey color, then deselect with Command/Ctrl + D.
查看头部路径是否完整,在路径上点击右键,选择“建立选区”,然后按确定。创建一个新图层并命名一个名字易记(在这个例子中,命名该层的“头”)中。
用灰色填充,快捷键: CTRL + D取消选区。
我再提供方法二:使用钢笔勾勒矢量图层后,灰色填充,点击矢量图右键选择“栅格化图层”,命名为“头”。

Step 6
Select the “Head” layer, create a group with Command/Ctrl + G and name this group “Head”.
Create a new layer above the layer “Head” (Shift + Command/Ctrl + N), name it “Shadow”, and choose “Multiply” mode.
Create a second layer (Shift + Command/Ctrl + N), name it “Light”, and choose “Screen” mode.
选择“头”图层,按 Ctrl + G组合图层,并命名该组合为“头”。
在“头”层上创建一个新图层( Ctrl +Shift + N),命名为“影”新层,并选择“叠加”模式。
创建第二层(Ctrl +Shift + N),命名为“光”,然后选择“正片叠加”模式。
Step 7
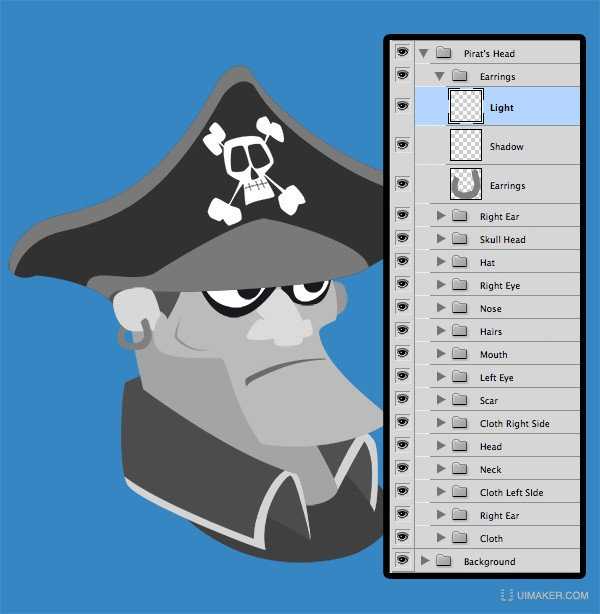
Repeat steps 5 to 6 for all the character’s parts.
重复步骤5至6所有操作的部分。
Step 8
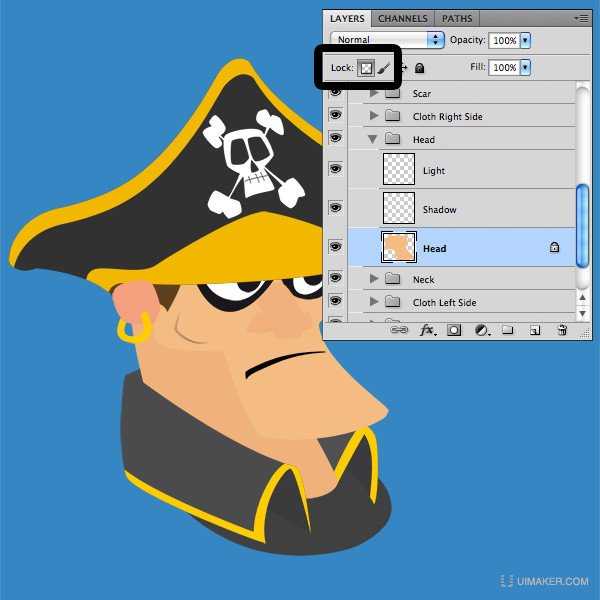
Ok, It’s time to bring some colors to our character. We are going to start with the head. Select the layer "Head", lock the transparency (by clicking the small icon "Lock" in the top left of the layers). Choose a color (#f4bc83), a hard brush (Opacity 100%) for coloring the head shape. Repeat this step for all the character’s shapes.
OK,是时候给人物上一些颜色。我们从头部开始,选择“头”图层,锁定图层,(按图层左上角小图标“锁定”)。设定颜色(#f4bc83),用100%硬笔刷涂绘头部形状。以下形状做同样步骤。
Step 9
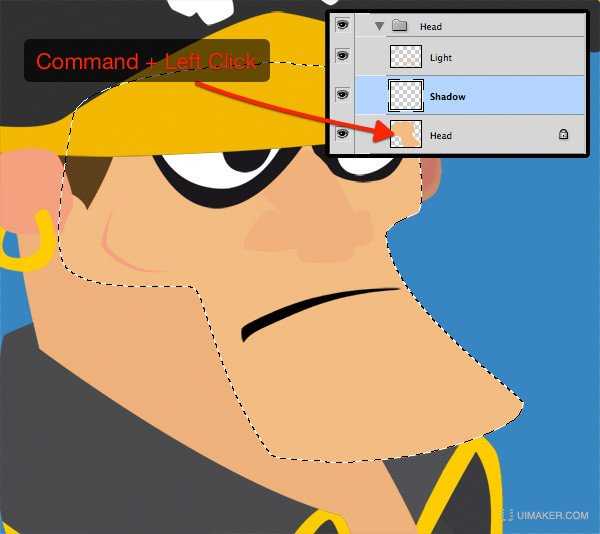
Select the “Shadow” layer then get the head selection by clicking on the “Head” layer with Command/Ctrl + Left Click. Hide the selection (Command/Ctrl + H). We’re now ready to work on the shadow’s head.
选择“阴影”层,按命令Ctrl+左键点击“头”图层。隐藏虚线选择(Ctrl+H),
我们现在准备画头部的阴影。
Step 10
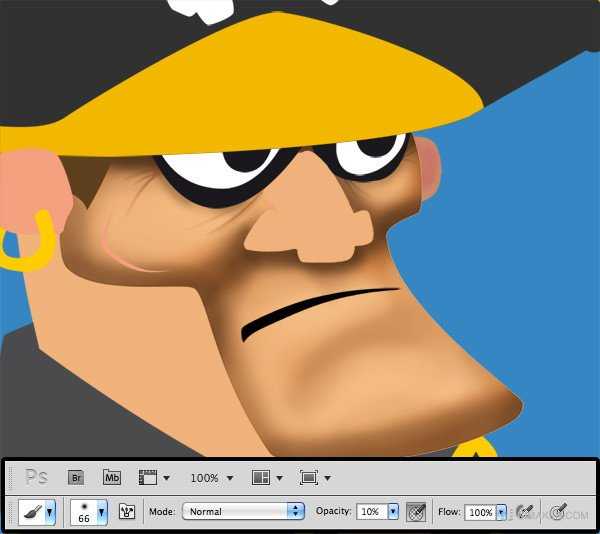
I’m starting with a soft 66 pixel brush with the opacity set to 10%. Start to draw the shadows with the same base color (#f4bc83) as the head, then gradually, choose a darker color. Adjust the brush size to suit your needs.
使用柔角画笔,设置为10px,透明度66%,选择与脸部基本颜色((#f4bc83),渐渐地选择较暗的颜色,调整画笔大小绘制,以满足你的需求。
Step 11
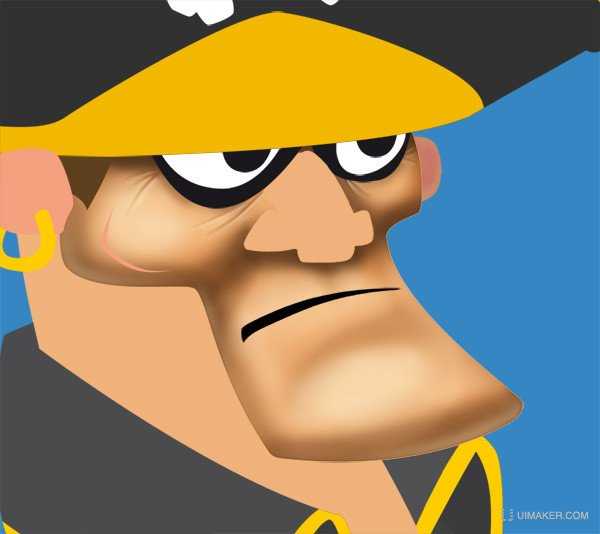
Do the same things on the “Light” layer, but this time, gradually choose a lighter color when drawing.
这次绘制脸部明亮的部分,但是这一次,是选择较浅的颜色绘制。
Step 12
Repeat steps 10 to 11 for all others parts of the character.
其余部分都重复10~11步骤的绘制方法。
Step 13
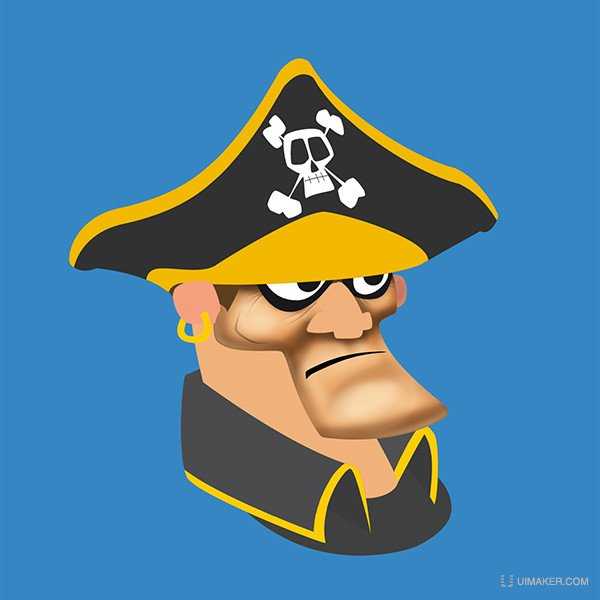
And voilà, the shadows and the lights has been added on most of the character’s parts. But there’re still some parts that deserve more details.
瞧,阴影和光亮就布满了人物的大部分。但有些地方依然存在不足,需要更多的细节。
Step 14
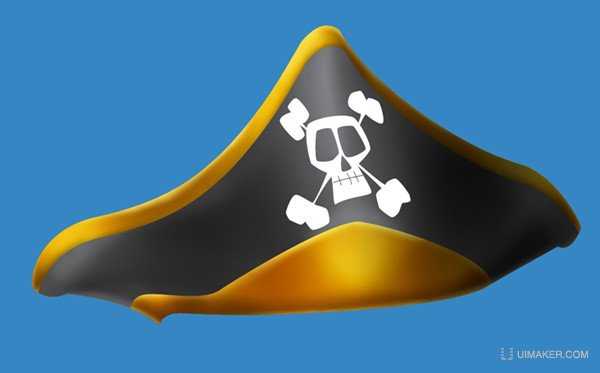
The hat looks good, but let’s add a little texture to it.
这顶帽子看起来不错,但是还需要让我们来添加一些纹理吧。
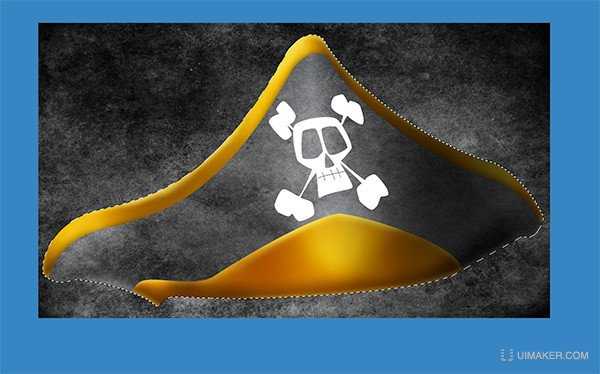
Step 15
Place the "Black and White Grunge" texture in the document (between the "Base" layer and the "Shadow" layer), name it "Texture" and resize it to fit the hat. Select the hat’s shape with Command/Ctrl + Left Click by clicking on the "Hat" layer, invert the selection with Shift + Command/Ctrl + I. Hit Delete and deselect with Command/Ctrl + D.
导入一张黑白纹理图片放置在阴影和光亮图层中间,命名为“纹理”,并调整其大小以适合帽子。选择帽子与命令Ctrl+左键点击帽子图层,命令 Ctrl+shift+I反选选区,命令Ctrl+D去掉选区。
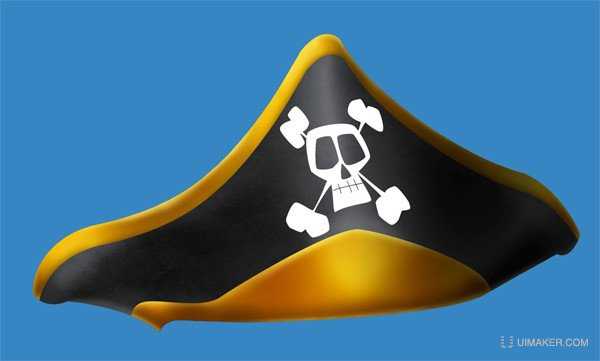
Step 16
Set the “Texture” layer to Multiply mode
设置“纹理”图层为正片叠底模式。
Step 17
Repeat steps 15 to 16 for the others clothes.
其他衣服纹理重复15~16步骤。
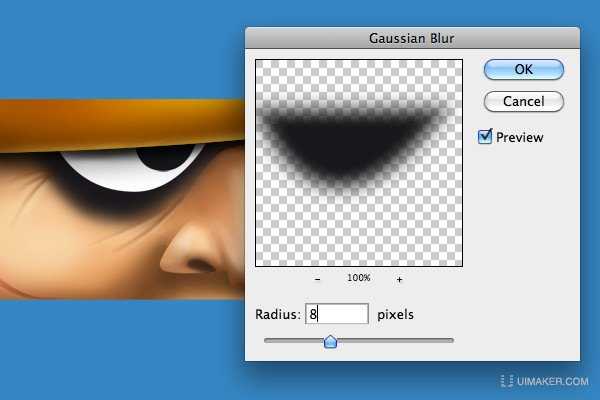
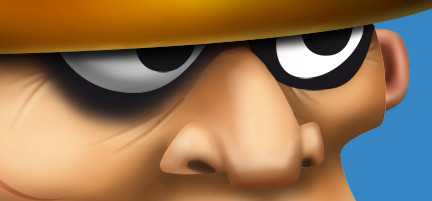
Step 18
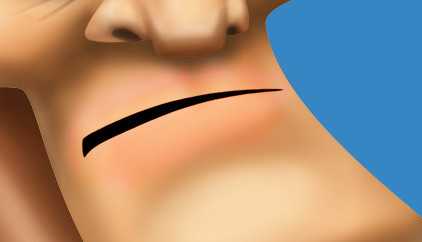
For the eyes, select the black border layer and apply a Gaussian filter on it.
对眼睛,选择黑色边框,选择滤镜>模糊>高斯模糊>半径8px.
Step 19
Like the previous steps, add the shadows on the “Shadow” layer.
像以前的步骤,添加“阴影”层的阴影。
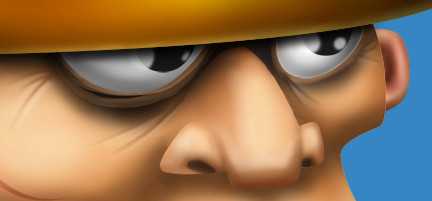
Step 20
Add the light in the eyes on the “Light” layer.
在“光”层添加高光。

Step 21
With the Eraser Tool (E), give the eye a better look by erasing the black border a little bit.
用橡皮擦工作给眼睛黑色边框擦除更好看些。

Step 22
Repeat steps 18 to 21 for the left eye.
重复18~21左眼的步骤。
Step 23
For the mouth, create a new layer and set mode to “Color” and the opacity to 50-55%, add a little bit of red around the mouth with a soft brush.
嘴部分,创建一个新图层,设置模式为为“颜色”,用50-55%的柔角画笔涂绘嘴边红点。
Step 24
上一页12 下一页 阅读全文
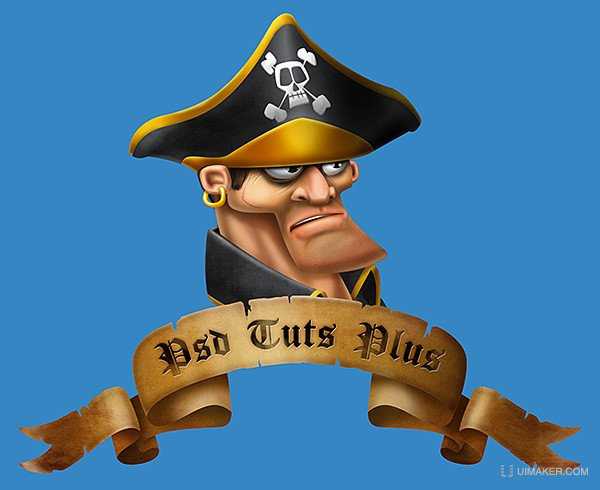
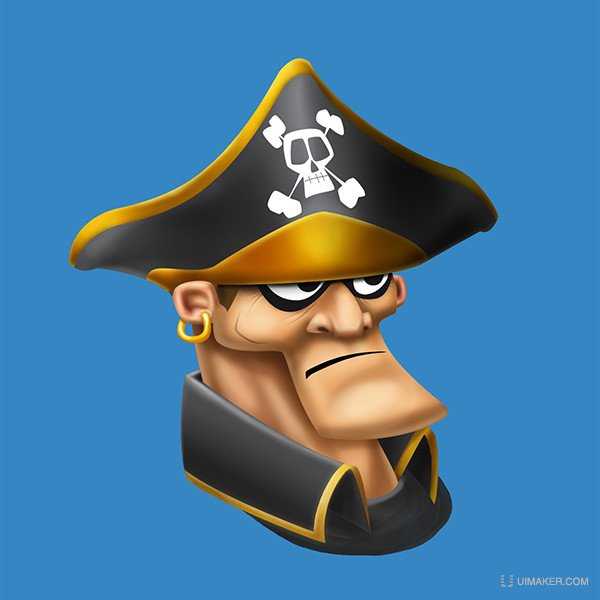
鼠绘,海盗
这一波大模型产业落地浪潮里,不少企业其实处在 “干瞪眼“的状态。
一种情况是,很多大模型产品看得见却摸不着,在台上一个个遥遥领先——今天Sora技精四座,明天英伟达的机器人又赢得满堂彩,可是到了台下一问:啥时候能用上啊?答曰:遥遥无期。
另一种情况是,企业想用上大模型,却又难免瞻前顾后——既要考虑场景融合,又得兼顾安全性,还要考虑打通现有系统,再加上各种部署成本和繁琐的采购流程……最后只能拂袖:罢了,再等等吧。
稳了!魔兽国服回归的3条重磅消息!官宣时间再确认!
昨天有一位朋友在大神群里分享,自己亚服账号被封号之后居然弹出了国服的封号信息对话框。
这里面让他访问的是一个国服的战网网址,com.cn和后面的zh都非常明白地表明这就是国服战网。
而他在复制这个网址并且进行登录之后,确实是网易的网址,也就是我们熟悉的停服之后国服发布的暴雪游戏产品运营到期开放退款的说明。这是一件比较奇怪的事情,因为以前都没有出现这样的情况,现在突然提示跳转到国服战网的网址,是不是说明了简体中文客户端已经开始进行更新了呢?
更新动态
- 凤飞飞《我们的主题曲》飞跃制作[正版原抓WAV+CUE]
- 刘嘉亮《亮情歌2》[WAV+CUE][1G]
- 红馆40·谭咏麟《歌者恋歌浓情30年演唱会》3CD[低速原抓WAV+CUE][1.8G]
- 刘纬武《睡眠宝宝竖琴童谣 吉卜力工作室 白噪音安抚》[320K/MP3][193.25MB]
- 【轻音乐】曼托凡尼乐团《精选辑》2CD.1998[FLAC+CUE整轨]
- 邝美云《心中有爱》1989年香港DMIJP版1MTO东芝首版[WAV+CUE]
- 群星《情叹-发烧女声DSD》天籁女声发烧碟[WAV+CUE]
- 刘纬武《睡眠宝宝竖琴童谣 吉卜力工作室 白噪音安抚》[FLAC/分轨][748.03MB]
- 理想混蛋《Origin Sessions》[320K/MP3][37.47MB]
- 公馆青少年《我其实一点都不酷》[320K/MP3][78.78MB]
- 群星《情叹-发烧男声DSD》最值得珍藏的完美男声[WAV+CUE]
- 群星《国韵飘香·贵妃醉酒HQCD黑胶王》2CD[WAV]
- 卫兰《DAUGHTER》【低速原抓WAV+CUE】
- 公馆青少年《我其实一点都不酷》[FLAC/分轨][398.22MB]
- ZWEI《迟暮的花 (Explicit)》[320K/MP3][57.16MB]